Your RV has been sitting for months. Maybe under a cover, maybe not. Either way, every inch of sealant on the exterior has been dealing with temperature swings, moisture, UV exposure, and the kind of freeze-thaw cycling that Michigan winters are known for. And while the body of the RV might look fine from ten feet away, the seals tell a different story up close.
Failed sealant is one of the leading causes of water intrusion in towable RVs. And water intrusion is where the real damage starts. We’re talking delaminated sidewalls, rotting wood framing, mold behind walls, and soft spots in the roof decking. That kind of damage gets expensive fast, and most of it is preventable with a thorough seal inspection before you take your first trip of the season.
What Happens to RV Sealant While It Sits All Winter
Sealant doesn’t just sit there unchanged while your RV is in storage. It’s a flexible material, and it responds to everything the weather throws at it.
When temperatures drop below freezing, sealant contracts. When they climb back up during a warm stretch in February, it expands. Do that enough times over the course of a Michigan winter and even high-quality sealant starts to crack, pull away from the substrate, or develop micro-gaps that you can’t see with the naked eye but that water finds immediately.
UV radiation compounds the problem. Even with a cover, some parts of your RV are getting sun exposure, and UV breaks down the polymers in most sealants over time. Lap sealant on the roof is especially vulnerable because it gets direct sunlight every day the cover shifts or isn’t on at all. After a few seasons without maintenance, it gets chalky, brittle, and starts flaking off in pieces.
None of this happens all at once. It’s gradual. That’s what makes it easy to miss and why a deliberate inspection in the spring matters more than a quick glance.
Where to Start: The Seals That Fail First
Not every seal on your RV is equally exposed. Some joints take more abuse than others, and those are the ones to check first.
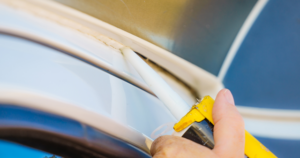
Start on the roof. Run your hand along the edges where the roof membrane meets the sidewall cap. That transition joint is sealed with lap sealant, and it’s one of the first places to crack. Check around every roof penetration: vent caps, the AC shroud, antenna mounts, refrigerator vent covers, and any aftermarket accessories. Every hole in the roof is a potential water entry point, and the sealant around each one needs to be intact and bonded to both surfaces.
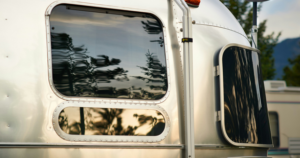
Move down to the windows. The frames are typically sealed with a combination of butyl tape behind the flange and lap sealant or caulk on the exterior edge. Look at the top corners first. That’s where water pools and where separation usually shows up. If you see daylight or a gap between the frame and the sidewall, water is getting in.
Check the entry door frame, any exterior compartment doors, and anywhere screws penetrate the exterior skin. Even the screws holding your clearance lights in place are sealed. If that sealant has cracked or pulled back, water follows the screw right into the wall cavity.
Slide-out seals are a different animal. The rubber wiper gaskets around the slide perimeter wear down, get compressed flat, or tear over time. If they’re not making full contact with the slide room when it’s retracted, rain blows right past them. Inspect the top seal especially. That’s where gravity does the most work pushing water into the gap.
What Bad Sealant Looks Like
Good sealant is pliable, bonded on both edges, and has no visible gaps or cracks. It flexes when you press on it and springs back.
Bad sealant looks different depending on how far gone it is. Early failure shows up as hairline cracks along the surface, usually running parallel to the joint. It might still be attached, but those cracks are already letting moisture through.
More advanced failure looks like peeling or lifting. The sealant separates from one or both surfaces it was bonded to, leaving an open channel underneath. Sometimes it curls up at the edges. Sometimes it looks like it’s still in place but has no adhesion when you press on it.
Chalking is another sign. If the sealant crumbles into powder when you rub it, the UV exposure has broken it down past the point of being functional. It needs to come off entirely and be replaced.
On the underside of the RV, look for staining, discoloration, or damp insulation near any seal that’s failed. If you see watermarks on the ceiling near a vent or around a window frame inside the RV, the exterior seal has already been compromised and water has found its way in.
Lap Sealant vs. Silicone vs. Butyl Tape
One of the most common mistakes people make when resealing is grabbing whatever tube of caulk they have in the garage. Not all sealants are compatible with RV materials, and using the wrong one can cause more problems than it solves.
Lap sealant (like Dicor self-leveling for roofs or non-sag for vertical joints) is the standard for most RV roof and exterior seam work. It bonds to EPDM rubber, fiberglass, and aluminum, and it stays flexible. Self-leveling goes on the roof where it can flow into joints. Non-sag goes on vertical surfaces where you need it to stay put.
Silicone caulk seems like a good idea, but it causes real problems on RV roofs. Most lap sealants won’t bond over silicone. So if you use silicone once, you’re stuck with it or you have to strip everything back to bare material before applying the correct sealant. Silicone also collects dirt and doesn’t paint over well. For most RV applications, skip it entirely.
Butyl tape is used behind window flanges, marker lights, and anywhere a gasket-style seal is needed between two surfaces being mechanically fastened together. It doesn’t cure. It stays tacky and pliable, which makes it ideal for joints that flex. If you’re pulling a window frame to reseal it, butyl tape is what goes behind it before you screw it back down.
Using the right product in the right location is just as important as doing the work in the first place.
When a Seal Failure Means Water Already Got In
If you’re catching cracked sealant early, before any moisture has made its way inside, you’re ahead of the game. Clean the old sealant off, prep the surface, and reapply. That’s a manageable job.
But if you press on the roof near a failed seal and it feels soft or spongy, water has already saturated the substrate underneath. On a rubber roof, that usually means the plywood decking has absorbed moisture and started to break down. On a sidewall, you might notice a section of fiberglass that looks slightly warped or bubbled. That’s delamination, and it means the fiberglass skin has separated from the luan backer due to water getting between the layers.
Inside the RV, look for staining around the ceiling edges, along window trim, and on the walls behind the slide-outs. A musty or mildew smell is another red flag. Even if you can’t see damage, that smell means moisture is trapped somewhere it shouldn’t be.
If water has been getting in for a while, the repair goes well beyond resealing. You’re potentially looking at replacing roof decking, sidewall framing, or the substrate itself. That’s a significant RV repair job and one that could have been prevented by catching the seal failure before the first trip of the year.
DIY Resealing vs. Bringing It to a Shop
Resealing a few joints on the roof or around a window is a reasonable DIY project if you’re comfortable on a ladder and willing to prep the surfaces properly. The key is removing all the old sealant cleanly, using the correct product for the surface material, and applying it in the right conditions. Most lap sealants need temperatures above 50 degrees to bond well, so early spring mornings in Michigan might be too cold. Wait for a dry, warm afternoon.
If you’re dealing with multiple failing seals, large sections of roof that need to be stripped and recoated, or any sign that water has already gotten into the structure, that’s when it makes sense to bring it in. At West Michigan Towable Solutions, we can inspect every seal on the RV, identify where water has already entered, and determine whether the damage underneath is surface-level or structural. That assessment saves you from doing cosmetic work on the outside while rot is spreading on the inside.
Spring is the right time to do this. Before your first trip, before you load up the gear, take an hour and go over every seal on the exterior. If everything looks tight, you’re good to go. If it doesn’t, get it taken care of now while the fix is still simple.